When I was a child, I remember making butter with my mother and sisters. My mom would fill up jugs with fresh milk and skim of the cream. The cream was put into a butter churn. The churn was a very large glass jar, maybe 3 gallons, with a lid with a crank attached to gears on the top and wooden paddles that were on a rod that hung down into the jar. The churn was in the fridge for days, while my mom filled it up with cream.
Mom would take the churn out of the fridge and have us take turns cranking it to spin the paddle. It was really fun to turn the crank and watch the paddles turn for the first bit, and then it became work. Once one us got tired, Mom would have the next one turn the crank to spin the paddles. She would take over once she sensed we were getting tired of it. We’d watch as the butter magically appeared!
She’d wash the butter, which at time I thought was really strange. I didn’t understand that there was still some milk in the butter. She’d put some in the fridge, and some in the freezer. It was really wonderful!
I found several recipes on how to make cultured butter in a food processor or a stand mixer and thought I’d make some butter. It was really wonderful butter! I used the following sites: https://www.tastecooking.com/recipes/cultured-butter-buttermilk/ https://www.abeautifulplate.com/how-to-make-cultured-butter/
12 oz butter/20 oz of buttermilk
Ingredients
- 4 cups (1 quart) of the best heavy cream you can find, such as 100% grass-feed cow cream. Do not use ultra-pasteurized, as it won’t work. Try to find cream without the stabilizers in it.
- 5-6 oz of live culture skyr yogurt or other live culture yogurt
- 1/4 teaspoon of salt (optional)
- Very cold or ice cold water
Tools:
Food processor or stand mixer with whisk attachment, 2 quart pot or an Ultra Instant Pot, a large bowl, a medium bowl, whisk, thermometer, dish kitchen towel, cheesecloth, fine-meshed sieve
Instructions
- In the large bowl, whisk the cream with the yogurt, until well mixed
- Pour the cream and yogurt into the pot, and heat over low until the cream measures 70 degrees F on the thermometer. (I love my Thermapen.) OR You can use your Ultra Instant Pot to heat the cream to 70 degrees F using the ultra function.
- Once the cream is heated, if using a pot, pour it back in the bowl, cover with the kitchen towel and leave at room temperature for 8 to 12 hours. If using your Instant Pot, set the ultra function to 70 degrees F and for 8 to 12 hours.
- Put the mixture in the fridge for at least 3 hours, but it works better if you let the cream sit in the fridge for 8 hours or longer. The cooler the cream, the better this works, as you want your butterfat to stay firm and not become greasy during churning.
- Churn the butter:
- Using a food processor. Fit your food processor with the metal chopping blade. Pour all of the cream into the bowl, fit the lid on, and turn it on (use high speed for multi-speed food processors). The mixture will first look like whipped cream, and then it will separate into butter and buttermilk. This process takes about three to five minutes. Do not walk away! Once you have butter made, the buttermilk will get mixed back into the butter if you leave the food processor running.
- Using a stand mixer: Put the stand mixer’s whisk and bowl in the fridge for an hour so they are cold. Pour the cream into the bowl of stand mixer and fit the whisk attachment and splash guard. If your mixer doesn’t have a splash guard, you’ll want to cover the mixer with a clean kitchen towel to prevent splattering. Whip the cream over medium-high speed until it has the texture of a soft whipped cream. “Reduce the mixer speed to medium-low and continue whipping until the liquid and butter fat just begin to separate and it looks curdled. Reduce speed to low – be sure to cover the mixer as it can splatter considerably at this stage – and continue whipping until the butter comes together as a solid mass on the whisk attachment.” abeautifulplate
- Hand churn: Churn until the butter has become a sold mass floating on top of the buttermilk.
- You will have butter and real buttermilk at this point. Over a large bowl, pour the buttermilk through the fine-mesh sieve to catch any bits of butter. Take the butter from the sieve and the rest of the butter and put in the center of your cheesecloth. Drain and squeeze the butter in the cheese cloth over the large bowl. Pour the buttermilk into a container with a tight lid. Refrigerate the buttermilk to use for making good things, like biscuits or cornbread! The buttermilk will last one to two weeks.
- Remove the butter from the cheesecloth and put it into an empty medium size bowl. Wash the butter with very cold water or ice cold water, pressing the butter against the sides of the bowl to release any excess buttermilk. The very cold or ice water helps firm up the butter. Strain the butter in the fine mesh sieve, wash again with very cold or ice cold water, and repeat until the water runs clear. If buttermilk is left in the butter, it will go rancid and and make the butter rancid. You want to squeeze out all of the buttermilk to help extend the life of the butter.
- If using salt, sprinkle it over the butter and kneading it in
- Divide the butter in half and wrap the butter tightly in wax paper. The butter will store well-wrapped in the refrigerator for up to a month. You can also freeze it for later use.
Notes:
For step 3, if your house is cold, the temp is lower than 70 degrees F, you can turn the light on in your oven and put the bowl with the cream in the oven.
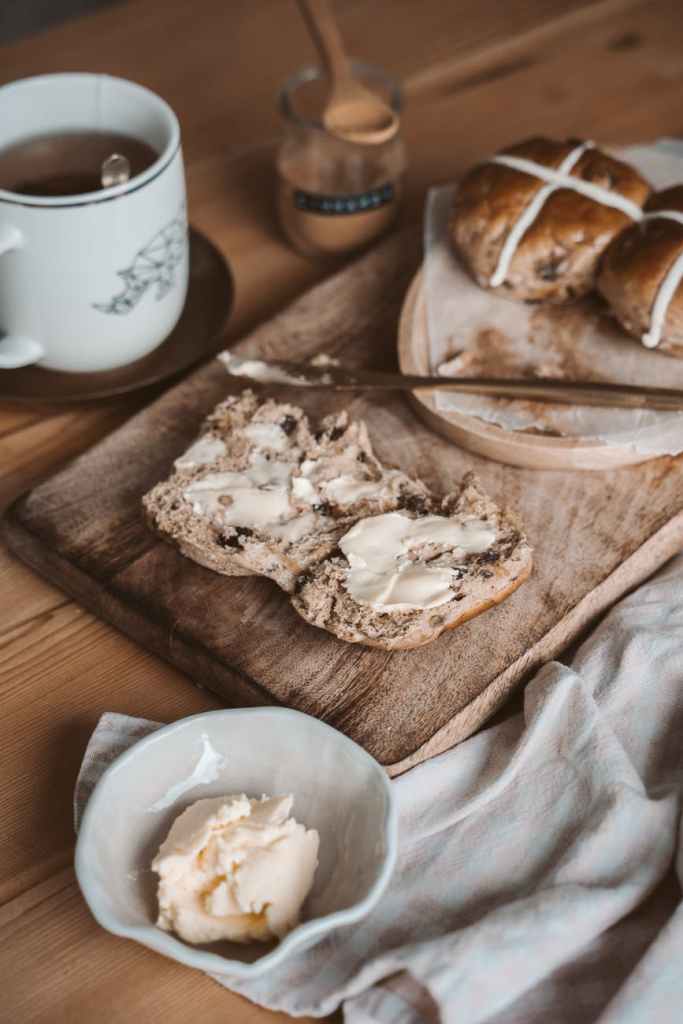
I would not recommend using this butter for baking. The fat content is not consistent. Consider it a condiment instead. Smear it on bread, toast, pancakes, waffles, use it on sandwiches, biscuits, or cornbread. Dollop it on vegetables, mmm, it is really good on boiled corn or a baked potato.

Wow! I should try that.
LikeLiked by 1 person
It is fun to make!
LikeLike
Yummy! And the memories too. There’s nothing like fresh-made butter.
LikeLiked by 1 person
Especially when it is spread on fresh backed bread!
LikeLiked by 1 person
Absolutely! 💯
LikeLiked by 1 person
*that should be “baked” not “backed”. 😂
LikeLike
When the children were younger, my husband and I made homemade butter regularly using vl ream from the local dairy. We did it much like your mom did – just cream and citation (we shook a smaller the jar than you used, with a weight inside to move things around). We all loved it! Now, things have changed and we don’t eat dairy.
LikeLiked by 1 person
My husband has trouble with cow dairy, milk and cheese. He does not seem to have problems with heavy cream or butter. Goat or sheep cheese doesn’t seem to bother him.
LikeLike
Looking forward to trying this!
LikeLiked by 1 person